To create a frame-based HTML page, simply click once with select over the
Framer icon on the iconbar, once you have loaded the application. You will
see the main window, which represents a Web Browser running in 640x480
resolution - the standard on Windows-based platforms, and for many other
browsers. This is not a restriction, as the frames are stored as
percentages, and will be scaled for larger display windows.
The main window will be filled by a single large frame. This is what you
will work with, splitting it up into sub-frames to suit your design. You
will soon realise that there are several rules governing the positioning
and setting up of frames - you can't place frames just where you feel like
it - you must always keep the whole window 'framed'.
To get started quickly, the two buttons at the far left of the toolbar
allow you to start splitting the main frame up into sub-frames. The third
button from the left allows you to set the frame's properties. To select
a frame, simply click on it. Notice that the size of the frame (as a
percentage of the current frameset) is displayed
on the toolbar. You can drag the edges of frames to resize them, although
you can only resize within the current frameset.
To set which file is displayed in the frameset, simply drag it onto the
required frame, or open the frame's properties and drag the file there. If
you have saved your HTML page of frames to disc, a relative path will be
created - this is preferable, as the location will be correct. If you haven't
saved your HTML page, then it is assumed that the linked page is in the same
directory as the main HTML frame page.
A frame is often misunderstood by those coming from a paper-based
DTP background. Frames bear little resembance to frames in DTP packages such
as Impression, Ovation or PageMaker, and are not used for free-form
positioning of text and graphics. Rather, HTML frames are designed to allow
more than one HTML document to be visible at once. For example, a common
use of frames is to provide a toolbar down one side of the screen, which
is fixed in place, and provides a navigation aid to the large main document
which would take up the rest of the display in a scrolling frame.
Alternatively, a small frame could be created along the bottom of the window
which could be used to provide information on products/phrases/ideas in
the main frame - a bit like interactive footnotes. Of course, with a little
imagination, frames can be used to create multiple choice tests, interactive
catalogues, multimedia presentations and the like.
Framesets contain frames. Whilst Framer shields you from
the majority of frameset issues, there are several rules you should
understand. Framesets can only consist of frames sharing the same left/right
or top/bottom edges. Framesets have a set direction, horizontal or vertical,
and a new frameset must be created if, for example, you wish to divide
a frame in a horizontal frameset, horizontally across the middle. This may
sound strange, but horizontal framesets can only be split vertically, from
top to bottom. To split horizontally requires the creation of a 'sub-frameset'.
Framer will automatically create sub-framesets when necessary, but you
should be aware that resizing a frame border which is shared with a
sub-frameset is not possible.
From left to right, the buttons on the toolbar do the following:

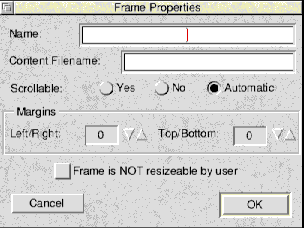
This dialogue box is fairly simple. All frames should really be given
names, although the main use is for specifying which frame a document
should be displayed in. This happens when you click on a link in one
frame which causes a new document to appear in another frame. The HTML
code for the link would be:
The content filename is the UNIX path (filename) for the file which is
to be displayed in the frame. Don't worry is you don't understand UNIX
paths - make sure you've saved your page of frames, then drag in the file
you wish to display. Framer will generate the filename automatically.
The scrollable option determines whether the frame appears in the browser
with scroll bars, allowing you to scroll up and down the frame. If set
to automatic, scroll bars will only appear if the contents of the frame
are larger than the frame itself. If for any reason you want to force the
scrolling property, set this to Yes or No.
The margins for a frame are the inset from the left/right or top/bottom for
the contents of the frame. This allows you to offset the contents from the
edge of the frame, to achieve a specific effect.
Finally, the specified sizes for frames are usually only 'default' values
used when the page is first displayed. The user can then adjust the frames
to suit. There may be times when this is not desirable, especially if you
are using the frame layout for a specific effect, and setting the Frame
is NOT resizable by user flag will disable this frame property.


The Save Frames and Create WWW Page options differ only in that the latter
will add the HTML header required by all HTML pages, whereas the former will
create the frame code ONLY. Preview is self explanatory, although at the
time of writing, no RiscOS browser supports frames, so previewing is somewhat
redundant. Things can only improve!
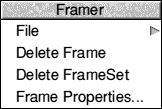
Delete Frame and Delete Frameset are fairly obvious. We don't recommend
using Delete Frameset unless you understand clearly what a frameset is!
Finally, Frame Properties opens the properties dialogue box for the selected
frame.